Solid Substrates for High-Performance Air Barriers


Not only do air barriers help protect buildings against devastating moisture issues, they dramatically improve energy efficiency by reducing air infiltration and exfiltration. Today’s air barriers are sophisticated materials with advanced properties to protect the building from water, air and sometimes vapor transfer. These products are developed by scientists and are tested in labs under ideal conditions. But buildings aren’t built in labs or by scientists and are often constructed in less than ideal conditions.
The truth is, air barriers are only as good as the substrate, and the substrate is almost always constructed by a different trade. Further complications for air barrier installation include weather, construction sequencing and adjacent materials coordination. This article will discuss the proper construction of the substrate and common pitfalls during air barrier installation in the field.
Perspectives
Modern construction is a complex business. Although we produce a product, we almost never produce the same product twice. We often have different owners, designers, manufacturers and trade partners working for the first time as a project team. Specifications allow multiple products for each scope resulting in dozens of potential combinations of products and systems. A quality director’s role is to assist project teams in assembling building enclosures that meet the designer's intent as well as providing the owner with a high-performance structure for decades to come.
Definitions
Air barriers can take many forms in the building enclosure. In this article we are primarily referring to a fluid-applied or self-adhering sheet applied air barrier membrane, but the concepts are applicable for almost any product that is required to stick. Air barriers are sometimes referred to as Weather Resistive Barriers (WRBs) or Air Vapor Barriers (AVB's) depending on the material properties required by the designer such as air and vapor permeance. For substrates, we focused the discussion on glass mat gypsum sheathing as it is our most common substrate for air barriers.
Key Material Properties for Constructability
The most important air barrier properties to a contractor are UV exposure, temperature limitations and compatibility with other materials. These properties directly affect our ability to properly sequence the work. With today's fast-paced construction schedules, we need to be "dried-in" as quickly as possible. Ideally, we like to build the exterior walls, apply the air barrier and install the window systems before the exterior cladding. This gets our jobs dried-in and takes the exterior cladding off the critical path.
UV and Temperature Limitations: If we select an air barrier with a 30-day UV exposure limit, it significantly reduces our Superintendents flexibility to sequence the work. During winter construction, a product that requires temperatures to be "40 degrees Fahrenheit and rising" doesn't work well in the Midwest—we just cannot count on the weather to be that good, and likely don't have the budget to tent in the building.
Compatibility Concerns: Compatibility has two variables—chemical and adhesive compatibility. Chemical compatibility means that products won't eat each other if in contact, while adhesive compatibility means one will stick to the other. Compatibility needs to be confirmed not only among air barrier materials, but everything in contact with it such as primers, sealants, masonry flashing, roof membrane, roof vapor barriers, foundation waterproofing, expansion joints, and on and on it goes.
Recommendations: When considering an air barrier for a project, we are looking for a material that gives our project team the most flexibility. In practice, this means a UV exposure of at least 90 days, application temperature down to at least 32F, and a wide range of compatible materials.
Common Fiberglass Mat Gypsum Sheathing Substrate Issues
- Fastener Type: Manufacturer's require corrosion resistant fasteners. We request exterior rated fasteners with a 500-hour salt spray rating or better. Zinc or Black Phosphate coated drywall screws are not for exterior use and do not meet this requirement.
- Fastener Spacing: Most manufacturers require sheathing to be fastened a minimum of 8 inches-on-center along every stud, not closer than 3/8 inches to the edge of the panel (See also Gypsum Association GA-253). For a 4-foot by 8-foot sheet installed horizontals, this will be seven fasteners along each stud including the two at the edge. (Often the fasteners are incorrectly installed at 12 inches-on-center based on the interior drywall spacing requirement.) If the sheathing is not attached correctly, we do not have a solid substrate for the air barrier. Note: For some wind loading or shear conditions, the fasteners are closer than 8 inches-on-center—verify with manufacturer's load tables.
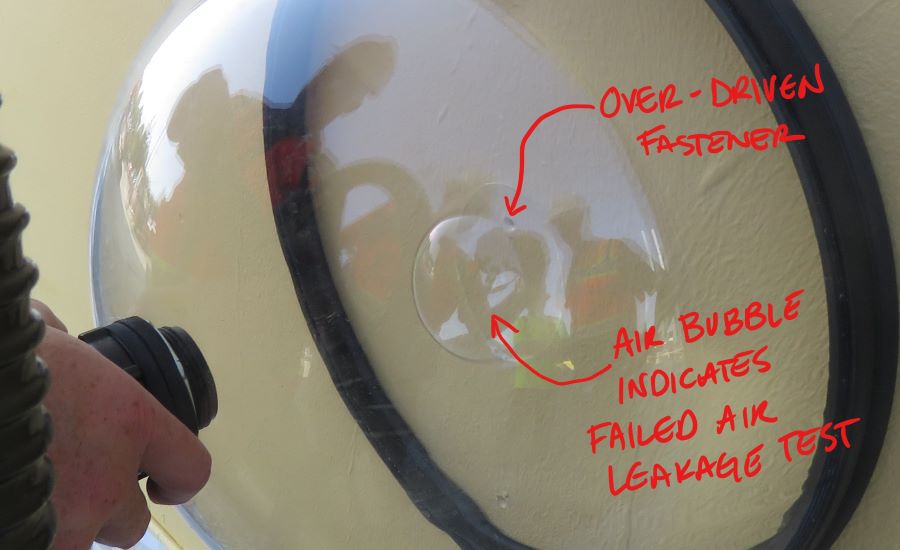
- Fastener under or overdriven: The fastener depth needs to be set flush. The sheathing mat should not be broken. The fastener should never be sticking out. For a fluid applied air barrier, an improperly driven fastener could result in a pin-hole in the system. For a self-adhering sheet air barrier, an under driven fastener will "tent" out the membrane.
- Sheathing Storage: Sheathing needs to be covered with a breathable tarp and up on dunnage if stored outside. The sheathing can withstand weathering installed vertically but not with water ponding on top. Improper storage can lead to delamination of the mat which would lead to failure as the air barrier is stuck only to the mat. (See GA-800 for storage requirements)
- Clean Sheathing: Sheathing soiled with dirt or rusted metal shavings are contaminated will not provide a good substrate for the air barrier to stick. Only clean sheathing should be installed.
- Outside Corners: Sheathing should overlap at the corners, a practice sometimes referred to as a Neat 90. This is critical to provide continuous support around the corners because most air barrier materials cannot typically span a gap more than 1/4 inches.
- Sheathing to Concrete: Sheathing needs to be held off the concrete 1/4 – 1/2 inches. This is to prevent the sheathing from wicking up water. Joints from sheathing to concrete are required to be sealed per the air barrier manufacturer's details.
- Sheathing Joints: Sheathing joints need to be tight and staggered. Excessively large joints could cause a self-adhered sheet air barrier to balloon out and fail due to excessive pressures at the joint. For fluid applied air barriers, large joints will require excessive prep with sealants.
- Openings: Sheathing needs to be installed flush with the edge of openings to allow the air barrier to wrap inside without bridging at the corner. When viewed from the outside, the stud should not be visible, and when viewed from the inside, the sheathing should not be visible.
- Damaged Sheathing: Damaged sheathing needs to be replaced stud to stud, minimum 6-inch size. Air barriers are designed and tested to stick to the facer, not raw or broken gypsum. Consequently, if sheathing is damaged, it needs to be replaced and not just covered up.
Common Air Barrier Installation Issues
- Improper Transitions: Most air barriers require a transition membrane at all changes in the substrate. This includes a change in substrate type, such as sheathing to concrete, or sheathing to steel, as well as transitions to openings, the roof, the foundation, etc. Transition locations are often the focus of compatibility studies where multiple manufacturers and systems come together. Ideal transition membranes should be made of materials that are compatible with most other materials.
- Primers: We often see primer not being used when required, primer applied too thick or too thin, primer not allowed to flash off, or primer not covered in the same day.
- Rollers not used: Most self-adhered air barrier membranes use pressure sensitive adhesives that must be rolled to stick at the tested strength. Hand pressure is not an effective substitute for using a roller. We consistently see self-adhered membranes being installed without a roller.
- Bubbles: The goal for any installation is no bubbles. Correction of bubbles varies by manufacturer, but typically bubbles need to be cut, rolled flat, and covered with a target patch. Since the target patch is then reverse lapped, all four sides are treated with sealant.
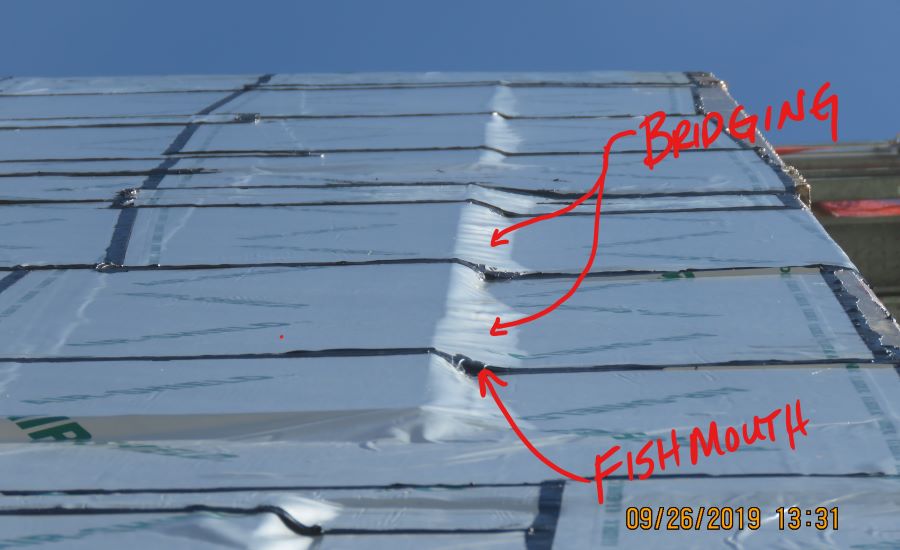
- Fish mouths: Fish mouths are open wrinkles at the edges of a membrane and can be a direct path for air or water into the building. Correction of bubbles varies by manufacturer, but typically bubbles need to be cut, rolled flat and covered with a target patch.
- Bridging: Air barrier materials typically cannot bridge more than 1/4 inches without a substrate. We often see this issue at inside corners and changes in substrates. The air barrier material needs to tuck fully into a corner, which typically requires the installer to start in the corner and work outwards. At changes in substrates, any gaps exceeding 1/4 inches need to be addressed with a compatible sealant, backer rod, wood blocking or sheet metal per the manufacturer’s instructions and details.
- Thickness: Fluid applied air barriers must be installed at the specified thickness for the membrane to perform as expected. Most often the membrane is too thin and needs another coat. The installer should use a wet mil thickness gage to periodically check thickness.
- Reverse Laps: Self-Adhered membranes should be installed in a shingled fashion. If a reverse lap is installed, most manufacturers allow the head (top) joint to be treated with sealant.
- Missing Night Seal: In order to properly shingle, self-adhered membranes are installed from the bottom up. When the top edge is left overnight, most manufacturers require this edge to be treated with sealant to prevent moisture infiltration behind the membrane. The sealant needs to be approved by the manufacturer for use under the membrane.
- Expansion Joint Detailing: The expansion joint product is typically connecting the cladding materials, but the air barrier must be continuous behind this product to connect the air barrier materials. The air barrier material that spans the expansion joint must be approved to be unsupported and allow the movement required in the expansion joint. Typically an air barrier membrane or transition membrane cannot span this gap without additional detailing.
Conclusions & Best Practices
Installing an air barrier on fiberglass mat sheathing looks simple on paper but can quickly become complicated in the field. Designers do not always include the required details, and trade partners do not always follow the manufacturer instructions, details or specifications. From the general contractor's perspective, we routinely see gaps in understanding and practice from both designers and trade partners.
Best Practices: To reduce this risk, we hold preconstruction coordination meetings with designers and trade partners to discuss expectations and potential pitfalls. We view mockups provide us as a great opportunity to verify the installer understands the standards. First work inspections and follow-up field reviews by the general contractor or third-party consultant are essential to confirm the installed work meets the project requirements.
We believe that by raising awareness of these issues amongst our project teams and following these construction quality best practices, contractors can reduce their risk and provide the owner a high-performance enclosure for the life of the building.
Looking for a reprint of this article?
From high-res PDFs to custom plaques, order your copy today!


