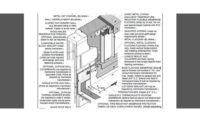
Roofing Detail: Coping-to-Wall Termination

A critical and often overlooked design detail is at the termination of a parapet
coping at a wall. The most common mistake at this intersection is to allow the
metal coping to but up to the wall without the application of termination
metal. The omittance of the termination metal leaves an opening at the top of
the coping and allows for moisture infiltration at the space between the
parapet wall and the structural wall. The installation of the coping-to-wall
termination provides waterproofing protection and allows for differential
movement between the two construction components.
Prior to the installation of the parapet coping, a metal flashing material shall be adhered to the structural wall. The metal flashing shall lap the parapet wall. The top of the metal flashing shall be terminated with a counterflashing that is either surface mounted or set in a reglet.
The metal coping is then applied over the completed wall flashing and secured in accordance with local wind zone requirements. (Perimeter metal coping materials must be in compliance with ANSI/SPRI ES-1 requirements.) A prefabricated sheet metal saddle flashing is applied at the junction of the structural wall and parapet wall to terminate exposed openings. The saddle flashing shall be set in two continuous beads of sealant.
A bead of continuous sealant shall be applied at the top of the counterflashing and the seams of the sheet metal saddle flashing.
2. Attach top of membrane wall flashing approximately 6" O.C.
3. See Appendix A for gauge or thickness guide for sheet metal flashing.
4. Continuous cleats are recommended when flashing face dimension exceeds 3 inches and in areas deemed high wind zone as categorized by local building code.
5. Certain components as depicted in these details may not be provided by the roofing contractor.
6. Pre-flashing the coping-to-wall termination with membrane flashing (e.g. with self-adhering membrane) is suggested prior to installation of sheet metal saddle flashing.

Prior to the installation of the parapet coping, a metal flashing material shall be adhered to the structural wall. The metal flashing shall lap the parapet wall. The top of the metal flashing shall be terminated with a counterflashing that is either surface mounted or set in a reglet.
The metal coping is then applied over the completed wall flashing and secured in accordance with local wind zone requirements. (Perimeter metal coping materials must be in compliance with ANSI/SPRI ES-1 requirements.) A prefabricated sheet metal saddle flashing is applied at the junction of the structural wall and parapet wall to terminate exposed openings. The saddle flashing shall be set in two continuous beads of sealant.
A bead of continuous sealant shall be applied at the top of the counterflashing and the seams of the sheet metal saddle flashing.
Notes
1. Dimensions shown are recommended minimums and are intended to be approximate to allow for reasonable tolerances due to field conditions.2. Attach top of membrane wall flashing approximately 6" O.C.
3. See Appendix A for gauge or thickness guide for sheet metal flashing.
4. Continuous cleats are recommended when flashing face dimension exceeds 3 inches and in areas deemed high wind zone as categorized by local building code.
5. Certain components as depicted in these details may not be provided by the roofing contractor.
6. Pre-flashing the coping-to-wall termination with membrane flashing (e.g. with self-adhering membrane) is suggested prior to installation of sheet metal saddle flashing.

Coping-to-wall
detail courtesy of the Western States Roofing Contractors Association.
Looking for a reprint of this article?
From high-res PDFs to custom plaques, order your copy today!


